Injection moulding is a critical process in contemporary manufacturing, facilitating high precision and efficient mass production of intricate components. Ensuring cost-effectiveness and upholding stringent quality standards hinge upon the meticulous prevention of defects at every phase of production, known as Injection Molding Defect Prevention.
Overview of the Injection Molding Process
Injection moulding involves injecting molten material into a mould cavity under high pressure. The material, typically a thermoplastic or thermosetting polymer, solidifies to form the desired shape as it cools. This method is preferred for producing complex geometries with consistent quality and minimal post-processing.
Importance of Preventing Defects
Preventing defects in injection moulding is crucial for several reasons:
- Cost Efficiency: Reducing defects minimizes material wastage and lowers production costs.
- Quality Assurance: Preventing defects ensures products meet design specifications and customer expectations.
- Operational Efficiency: Smooth production processes enhance overall efficiency and reduce downtime.
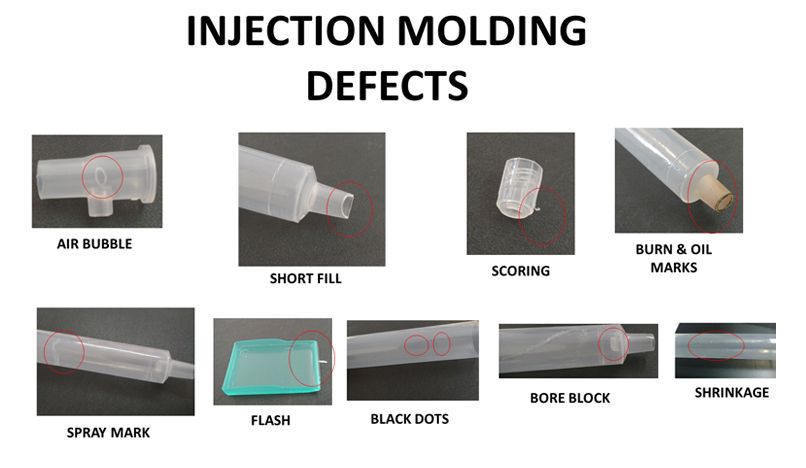
Common Injection Molding Defects
1. Burn Marks
- Description: Burn marks appear as discolouration or black spots on the moulded part’s surface.
- Causes: Excessive heat or prolonged residence time of the molten material in the mould.
- Prevention: Optimize cooling time and ventilation to dissipate heat effectively.
2. Surface Delamination
- Description: Layers or flakes separate from the surface of the moulded part.
- Causes: Poor material bonding during cooling.
- Prevention: Ensure uniform melt temperature and proper mould surface finish.
3. Sink Marks
- Description: Depressions or indentations on the part’s surface, typically near thick sections.
- Causes: Inadequate cooling or excessive packing pressure.
- Prevention: Optimize gate location and cooling system design to control cooling rate.
4. Warping
- Description: Distortion or bending of the moulded part from its intended shape.
- Causes: Non-uniform cooling or residual stress within the material.
- Prevention: Maintain uniform wall thickness and optimize cooling system design.
5. Flash
- Description: Excess material protruding from the mould parting line.
- Causes: Insufficient clamping force or worn mould components.
- Prevention: Increase clamping force and regularly inspect mould tooling for wear.
6. Short Shots
- Description: Incomplete mould cavity filling, resulting in a partial or undersized part.
- Causes: Inadequate injection pressure, insufficient material, or improper mould venting.
- Prevention: Fine-tune injection parameters and ensure proper venting.
7. Weld Lines
- Description: Lines or marks where molten material flows and meets in the mould cavity.
- Causes: Poor material flow or inadequate injection speed.
- Prevention: Optimize gate type and position to improve material flow.
8. Jetting
- Description: String-like protrusions on the moulded part’s surface.
- Causes: High-speed material injection or improper gate design.
- Prevention: Adjust injection speed and gate geometry to minimize turbulence.
9. Flow Lines
- Description: Visible lines or streaks on the part’s surface indicate uneven material flow.
- Causes: Improper injection speed, temperature, or mould design.
- Prevention: Fine-tune processing parameters for consistent material flow.
Strategies to Prevent Injection Molding Defects
Optimize Mold Design
- Ensure Uniform Wall Thickness: Prevents uneven cooling and reduces warping.
- Proper Gate Location and Type: Optimizes material flow and reduces flow-related defects.
- Adequate Venting: Prevents air traps and enhances part quality.
Fine-tune Processing Parameters
- Adjust Melt and Mold Temperature: Controls material viscosity and reduces defects like burn marks.
- Control Injection Speed and Pressure: Optimizes material flow and reduces jetting and flow lines.
- Optimize Cooling Time and Rate: Ensures uniform part cooling and reduces sink marks and warping.
Select Appropriate Materials
- Consider Material Properties and Behavior: Choose materials with suitable thermal, mechanical, and aesthetic properties for the application.
- Suitability for Part Design and Application: Ensure materials can withstand operational and environmental stresses.
Maintain and Inspect Equipment
- Establish Preventive Maintenance Schedule: Ensures mold and equipment reliability.
- Regularly Inspect Mold Tooling: Detects wear or damage that could lead to defects.
- Check Mold Vents and Runners: Ensure proper venting is used to prevent gas traps and burn marks.
- Monitor Clamping Force: Prevents flash and ensures consistent parting line closure.
- Evaluate Temperature Control Units: Maintain consistent mould temperatures critical for part quality.
Implement Quality Control Measures
- Conduct Regular Quality Checks: Inspect parts for defects and ensure compliance with specifications.
- Use Advanced Inspection Technologies: Enhances defect detection and process control.
- Analyze and Address Recurring Issues: Identify root causes and implement corrective actions for continuous improvement.
Best Practices for Specific Defects
Tailoring solutions to specific defects enhances production efficiency and product quality:
- Increasing Clamping Force for Flash: Ensures tighter mold closure to prevent flash formation.
- Adjusting Injection Speed for Jetting: Reduces turbulence during material injection to minimize jetting defects.
Conclusion
Effective Injection Molding Defect Prevention requires a proactive approach to ensure high-quality and cost-effective production. Manufacturers achieve consistent, defect-free parts meeting stringent industry standards through optimized mould design, precise processing parameter adjustments, meticulous material selection, rigorous equipment maintenance, and strict quality control implementation.